The picture below shows the fuselage wing tank plumbing on the passenger side. There is similar plumbing that needs access on the pilot side, so this procedure was actually performed twice. A large, curved panel is what covers this section of the fuselage. In order to gain access for maintenance, I stole a brilliant but fairly simple idea from another awesome RV-12 builder, Dick Gossen.
First step was to perform a relatively precise removal of material from the panel as shown below.
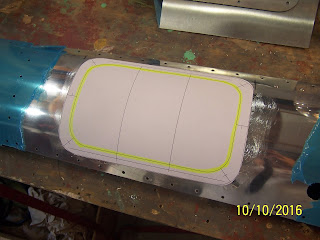
To arrive at that finished product required a few intermediate steps as shown below. First, a CAD drawing was made and then applied to the panel with some contact cement. The yellow line is the CORRECT cut out to make - did not want to cut to the wrong dimension, so checked it twice!
Now, a uni-bit was applied to give me some room for the business end of the hand-powered nibbler as shown below.
Nibbling away....
And just when you think it will never end, it does.
Next, I needed to fabricate the access cover, so I used a piece of large diameter PVC tubing and a ratcheting strap and tried to put a permanent smooth curve into a piece of 0.040 inch thickness of 6061-T6 aluminum sheet. I was skeptical it would work with this thickness.
To my surprise, the thing took a pretty nice bend, along with some additional encouragement by hand. The photo below shows the access cover blank laying inside the larger fuselage side panel.
The finished product, trimmed to size, nutplates installed and holding the cover and panel together. I think this will work - thanks Dick!


No comments:
Post a Comment